User Guide
MediBase3 (MB3) is a desktop app for doctors, offering an all-in-one solution to manage patient records with ease. From tracking medical conditions, allergies, and priorities to even scheduling appointments, MediBase3 takes care of it so you can focus more on your patients.
Optimised via combining both Command Line Interface (CLI) and an intuitive Graphical User Interface (GUI), if you can type fast, MediBase3 can get your patient management tasks done faster than traditional GUI apps.
Table of Contents
- Table of Contents
- How to use this User Guide
- Quick Start
- Features
- Glossary
- FAQ
- Known issues
- Command summary
How to use this User Guide
This guide is designed to help you make the most of MediBase3, whether you’re a new or experienced user. It provides all the necessary information to effectively navigate and utilise MediBase3’s features.
Each part of MediBase3 is covered in separate sections, accessible through the Table of Contents above.
For new MediBase3 users:
- We recommend that you refer to the Glossary section to understand the key terms used in the guide.
- Once you are done, do head to the Quick Start section to get started with setting up MediBase3.
For experienced MediBase3 users:
- If you need a quick refresher on how to use a specific feature in MediBase3, you can navigate to the Features section.
- You may also skip to the Command Summary section for a quick overview of all available commands in MediBase3 and their formats.
For any additional information or queries, you can refer to the FAQ section or the Known Issues section.
Quick Start
In this section, let’s learn how to set up MediBase3 on your computer.
Installing MediBase3
Step 1: Check if you have Java 17 installed on your system.
Before running MediBase3, ensure that Java 17 is installed on your system.
Open Command Prompt (Windows) or Terminal (macOS/Ubuntu/Debian) and type:
java -version
If you are using Windows, you should see something like:
Java Version in Windows

This means that your machine is running Java version 17.0.12, which means that Java 17 is installed.
if you are using macOS, Ubuntu or Debian, you should see something like this:
Java Version in Mac

This means that your machine is running Java version 17.0.11, which means that Java 17 is installed.
If your machine is not running Java 17, you may refer to the FAQ section for instructions on installing Java 17.
Step 2: Download the MediBase3 JAR File
-
Go to this link and scroll down all the way to ‘Assets’. You should see something like this:

Asset Files in GitHub
- Click on
medibase3.jarto download the latest MediBase3 JAR File. - Save the file to a location of your choice (e.g.,
Downloadsfolder).
Launching MediBase3
- Open Command Prompt (Windows) or Terminal (macOS/Ubuntu/Debian).
- Navigate to the directory where the
.jarfile is located. For example:cd Downloads - Run the application by typing:
java -jar medibase3.jar
You should be greeted by the GUI, which you will see in the next section.
Overview of the GUI
Overview of the Graphics User Interface
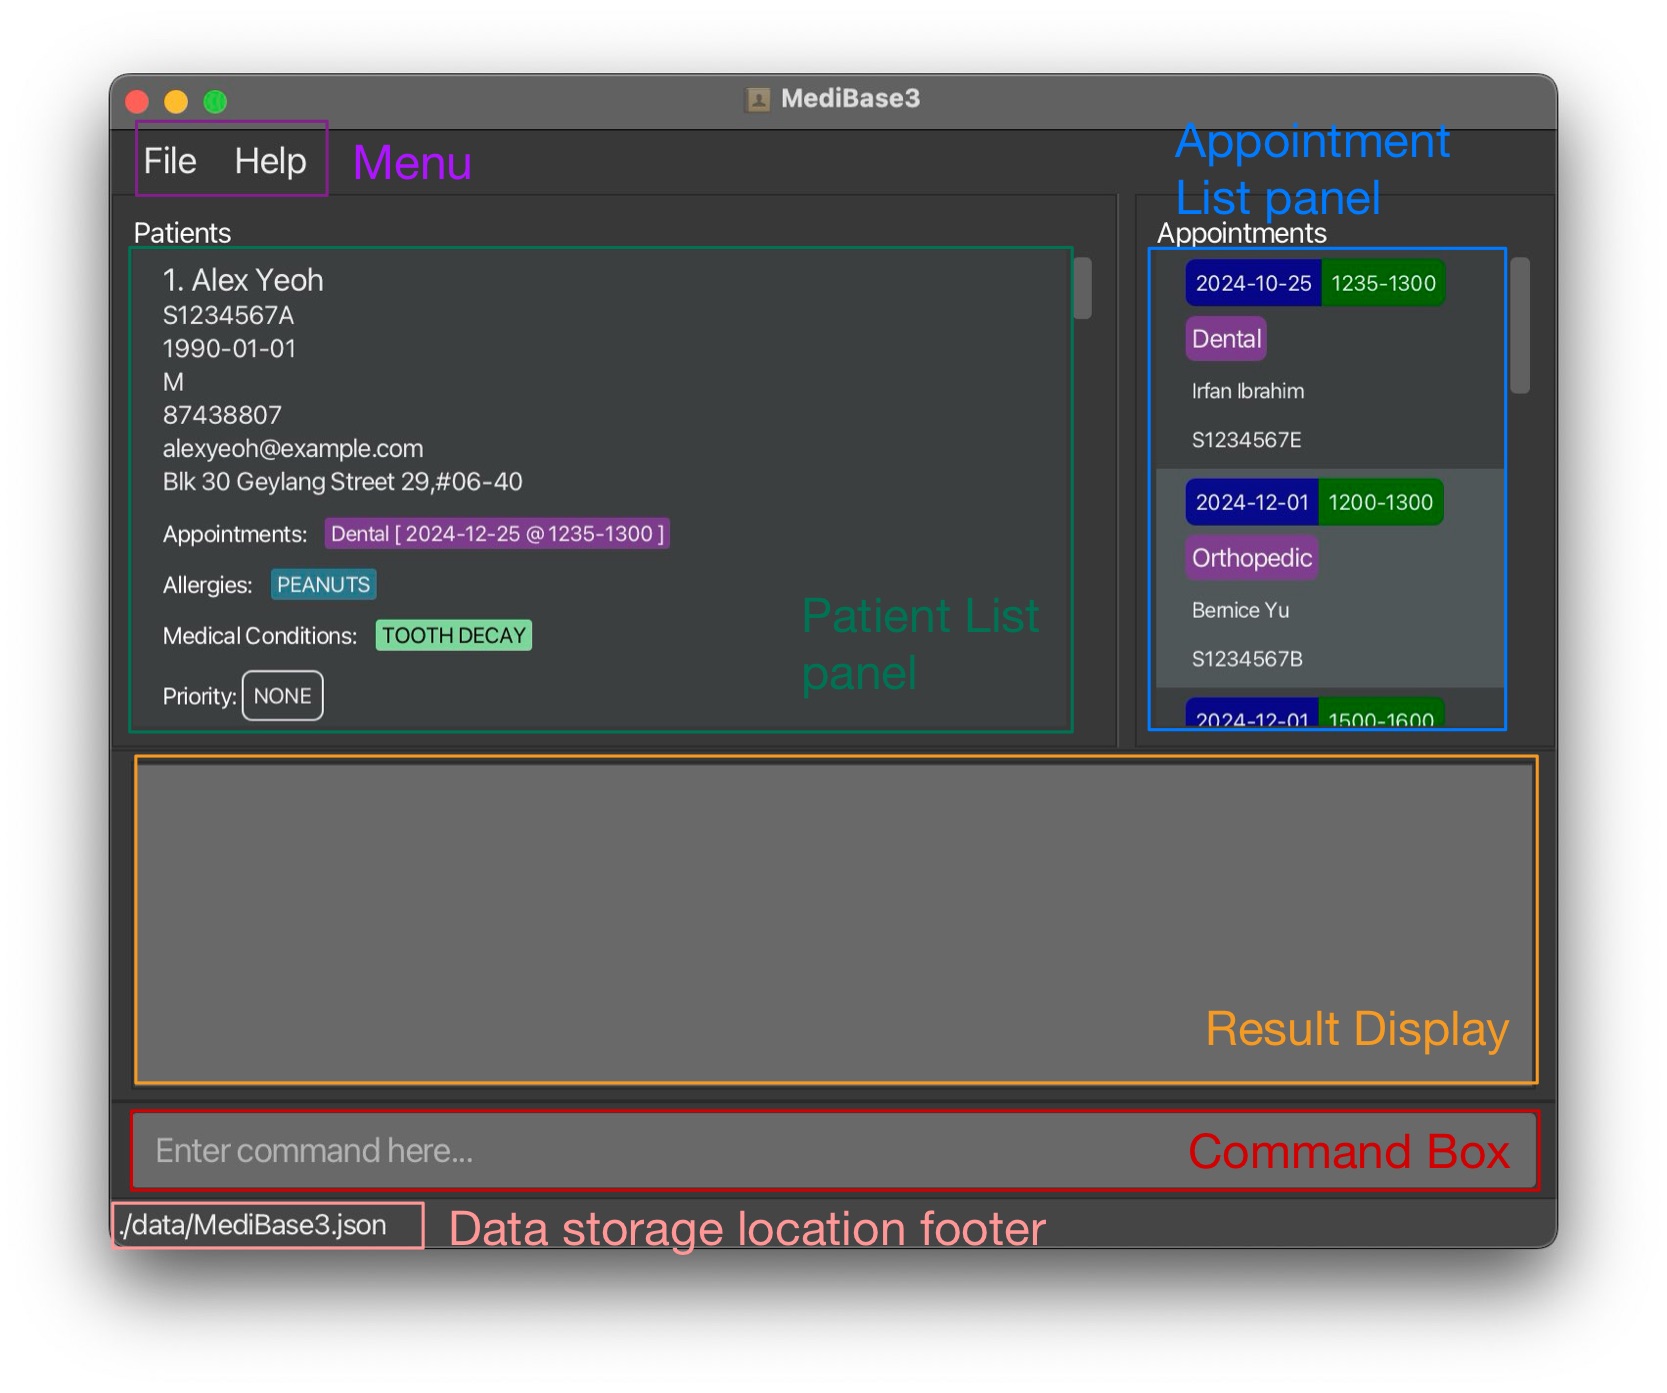
Once MediBase3 is running, you will see the main interface, as seen in the image above. It is segmented into different panels. Here’s an overview of the key panels:
- Command Box: Where you can type and enter commands.
- Result Display: Shows the result of the command you entered.
- Patient List: Displays all the patients currently stored in the system.
- Appointment List: Displays the scheduled appointments for patients in chronological order.
- Menu (File/Help): Provides additional options for managing the app (e.g., exit, access help).
- Data Storage Location Footer: Displays the location where patient and appointment data are stored.
Overview of CLI
MediBase3 can be controlled using commands in the Command Line Interface (CLI).
CLI Command Structure
Each command in MediBase3 follows a structured format to ensure consistency and ease of use.
The example below demonstrates this structure:
Anatomy of the Command Structure

This example shows how a typical command might look in MediBase3, with three main components:
| Component | Description |
|---|---|
| Command | The action you want to perform (e.g., add, edit) |
| Prefix | Identifies the data being entered (e.g., n/ for name) |
| Parameter | The value associated with the prefix (e.g., John Doe) |
| Preamble | The value immediately after the command with no prefixes (e.g., S1234567A) |
Note:
- This example is provided to give a general idea of the command structure. Actual commands may vary depending on the specific action and data required.
Example:
edit S1234567A n/John Doe i/S8234567B d/2000-01-01 g/M p/98765432
e/johnd@example.com a/311, Clementi Ave 2, #02-25
-
Command:
edit -
Preamble:
S1234567A -
Prefix:
n/(name),i/(NRIC),d/(date of birth),g/(gender),p/(phone),e/(email),a/(address) -
Parameter:
John Doe,S8234567B,2000-01-01,M,98765432,johndoe@example.com,311, Clementi Ave 2, #02-25
A First Look at MediBase3
Here are some basic commands to get you started.
-
help: Opens the help window. -
add n/John Doe i/S1234567A d/2000-01-01 g/M p/98765432 e/johnd@example.com a/311, Clementi Ave 2, #02-25:
Adds a patient named John Doe to the system. -
edit S1234567A p/91234567 e/johndoe@example.com:
Edits the phone number and email of the patient with NRICS1234567A. -
findNric T0123456A:
Finds and displays the patient with NRICT0123456A. -
delete T0123456A:
Deletes the patient with NRICT0123456A. -
clear:
Clears all patient and appointment data from the system.
You’re now ready to start using MediBase3.
For a detailed list of features and instructions, see the Features section.
For additional assistance or common questions, please refer to our FAQ section.
Features
Parameter Details
The table below provides a brief explanation of each parameter associated with a patient in MediBase3. It also details the constraints of each parameter when used in a command.
Caution:
- Ensure that all parameters adhere to the constraints mentioned below. Otherwise, the command will not be executed, and an error message will be displayed.
- Accented or diacritical characters (e.g., é, ü, ç) and characters from other languages are currently not supported.
| Parameter | Definition | Constraints | Examples |
|---|---|---|---|
NAME |
Name of the patient |
|
John Doe$ally
|
NRIC |
Singapore National Registration Identity Card (NRIC) number of the patient. It is unique for all patients. |
|
S1234567A t1234567b 1234567A
|
DOB |
Date of birth (DOB) of the patient. |
|
2002-12-12 2002/11/32
|
GENDER |
Gender of the patient. |
|
mFMale
|
EMAIL |
Email address of the patient. |
|
raj@gmail.com jie.lun+work@n.abc-123.org raj jie..work@hotmail.com yz@u.example.c-m wn@s-g
|
ADDRESS |
Address of the patient. |
|
Orchard Road, Block 124, #02-01
|
PHONE |
Phone number of the patient. |
|
98765432+65 9876 5432
|
ALLERGY |
Allergy of the patient. |
|
PeanutsPe@nuts Pea nuts
|
PRIORITY |
Priority of the patient. |
|
NONE high Highpriority
|
CONDITION |
Medical Condition of the patient. |
|
High Blood Pressure @high-bp High Blood Pressure
|
APPOINTMENT_DATE |
Appointment date of the patient. |
|
2024-10-27 2022/10/27 2024-02-31
|
APPOINTMENT_TIME |
Appointment time of the patient. |
|
0900-1100 2330-2359 0900-0900 1400-1300 2200-0000
|
APPOINTMENT_NAME |
Description of the appointment with the patient. |
|
Dental FollowUp1 Follow-up#1
|
Words in
UPPER_CASEare the parameters to be supplied by the user. e.g. inadd n/NAME i/NRIC g/GENDER d/DOB p/PHONE e/EMAIL a/ADDRESS,NAMEis a parameter which can be used asn/John Doe.Items in square brackets are optional. e.g
edit NRIC [n/NAME] [i/NRIC] [d/DOB] [g/GENDER] [p/PHONE] [e/EMAIL] [a/ADDRESS]can be used asedit S1234567A n/John Lim g/Mor asedit S1234567A g/M.Items with
…after them can be used multiple times. e.g.c/CONDITION…can be used as,c/Knee Pain,c/Flu c/Feveretc.Parameters that have a prefix can be in any order. e.g. if the command specifies
n/NAME p/PHONE,p/PHONE n/NAMEis also acceptable.Parameters that have no prefix must follow the specified order in the command format. e.g. if the command specifies
NRIC n/NAME p/PHONE,NRICmust take precedence overn/NAMEandp/PHONE.Extraneous parameters for commands that do not take in parameters (such as
help,list,exitandclear) will be ignored. e.g. if the command specifieshelp 123, it will be interpreted ashelp.The command name and prefixes are case-insensitive. e.g.
addis the same asADD,c/is the same asC/.If you are using a PDF version of this document, be careful when copying and pasting commands that span multiple lines as space characters surrounding line-breaks may be omitted when copied over to the application.
All commands (except those in the Finding Patients section) will refresh the Patient List Panel to show all patients upon successful execution. This applies to commands for managing patients, appointments, medical conditions, allergies, and priority.
Managing Patient
Adding a patient: add
Adds a patient and his/her relevant details to MediBase3.
Format: add n/NAME i/NRIC d/DOB g/GENDER p/PHONE e/EMAIL a/ADDRESS
- All fields are compulsory and must be non-empty.
- If the
NRICprovided already exists in MediBase3, an error message will be displayed, and the patient will not be added.- The new patient will be added to the end of the Patient List Panel.
- Refer to the Parameter Details section for more information on the purpose and constraints of each parameter.
Examples:
-
add n/John Doe i/S1234567A d/2002-12-12 g/M p/98765432 e/johnd@example.com a/Orchard Road, Block 124, #02-01adds a patient namedJohn Doewith the respective NRIC, gender, date of birth, phone number, email and address provided into MediBase3.
Tips:
- Remember that
NRICandGENDERare case-insensitive.
- e.g.
i/s1234567aandi/S1234567Aare both equivalent.- Made a mistake or a typo? You can use the
editcommand to update the patient’s details.
Deleting a patient : delete
Deletes a patient and his/her details from MediBase3.
Format: delete NRIC
- Deletes the patient with the specified
NRICfrom MediBase3.- The
NRICprovided must be the full NRIC of the patient to be deleted.
- e.g.
S1234567A(not partial, likeS123).- Refer to Parameter Details for NRIC constraints.
Example:
-
delete S1234567Adeletes the patient with the NRICS1234567A.
- Patient information cannot be recovered once deleted. Double-check the
NRICbefore deletion.- Deleting a patient also removes all associated appointments from the Appointment List Panel.
Editing a patient : edit
Edits an existing patient details in MediBase3.
Format: edit NRIC [n/NAME] [i/NRIC] [g/GENDER] [d/DOB] [p/PHONE] [e/EMAIL] [a/ADDRESS]
- Edits the patient with the specified
NRICin MediBase3.- The NRIC provided must be the full NRIC of the patient to be edited.
- e.g.
S1234567A(not partial, likeS123).- At least one of the optional fields must be provided.
- e.g.
edit S1234567Ais invalid.- Existing values will be updated to the given input values.
- Refer to Parameter Details for constraints on each parameter.
Example:
-
edit S1234567A p/91234567 e/johndoe@example.comwill edit the phone number and email address of the patient with the NRICS1234567Ato91234567andjohndoe@example.comrespectively.
Editing the patient’s
NAMEorNRICwill also update his/her associated appointments in the Appointment List Panel to reflect the change.
Managing Appointments
Adding an Appointment : addAppt
Schedules an appointment for a patient in MediBase3.
Format: addAppt APPOINTMENT_NAME i/NRIC @d/APPOINTMENT_DATE @t/APPOINTMENT_TIME
- Adds an appointment with the specified
APPOINTMENT_NAME,APPOINTMENT_DATE, andAPPOINTMENT_TIMEfor the patient identified byNRIC.- Refer to Parameter Details for constraints on each parameter.
- For each patient, appointment times cannot overlap.
- Earliest valid appointment time is
0000, and latest is2359.- Appointments cannot span across date boundaries
Example:
-
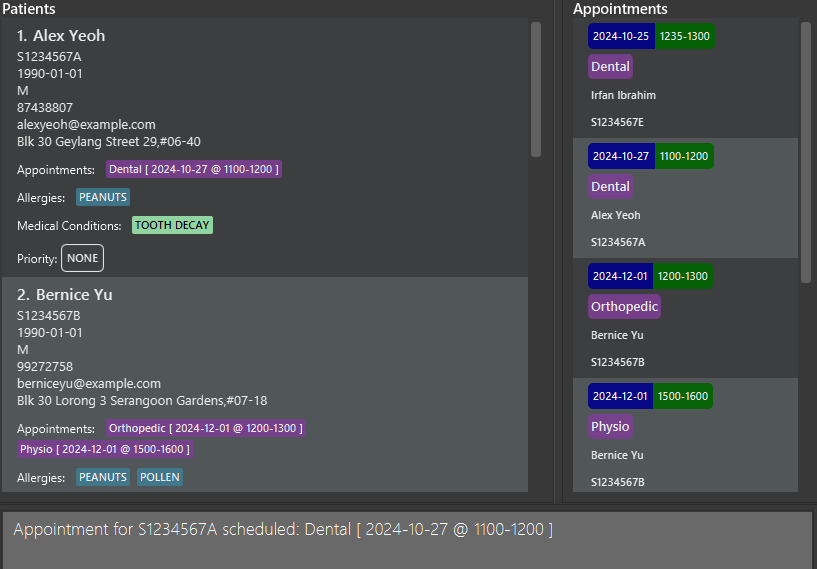
addAppt Dental i/S1234567A @d/2024-10-27 @t/1100-1200schedules aDentalappointment for the patient withNRICS1234567Aon2024-10-27, from1100to1200.
Success message, with the “Dental” appointment in the details of patient “Alex Yeoh (S1234567A)” in the patient list panel, as well as in the appointment list panel as the second entry.
- Adding a new appointment will update the Appointment List Panel on the right with the new appointment details.
- Appointment names need not be unique.
- Different patients may have overlapping appointment timings, as long as those appointments are not from the same patient.
- For appointments that span across date boundaries, add two appointments:
- End the first appointment at
2359(e.g.,addAppt Transfusion i/S1234567A @d/2024-10-23 @t/2200-2359).- Start the next appointment at
0000on the following date (e.g.,addAppt Transfusion i/S1234567A @d/2024-10-24 @t/0000-0100).- Appointment end times are exclusive. For example:
- If Appointment A is scheduled from
1200to1300, Appointment B can start at1300.- Appointment B cannot start between
1200and1259, nor end between1201and1300.
Deleting an Appointment : delAppt
Deletes a scheduled appointment from MediBase3.
Format: delAppt i/NRIC @d/APPOINTMENT_DATE @t/APPOINTMENT_TIME
- Only
NRIC,APPOINTMENT_DATE, andAPPOINTMENT_TIMEare required;APPOINTMENT_NAMEis not needed.- Refer to Parameter Details for constraints on each parameter.
Example:
-
delAppt i/S1234567A @d/2024-10-27 @t/1100-1200deletes an appointment on2024-10-27from1100to1200for the patient withNRICS1234567A.
Managing Medical Conditions
Adding Medical Conditions : addMedCon
Adds one or more medical conditions to an existing patient in MediBase3.
Format: addMedCon i/NRIC c/CONDITION...
- Adds the specified
CONDITIONto the patient identified byNRICin MediBase3.- At least one
CONDITIONmust be provided.
- e.g.
addMedCon i/S1234567Ais invalid.- Each medical condition can only be added once per patient.
- If both unique and duplicate conditions are entered in a single command, an error will be returned, and none of the conditions will be added.
- Refer to Parameter Details for constraints on each parameter.
Example:
-
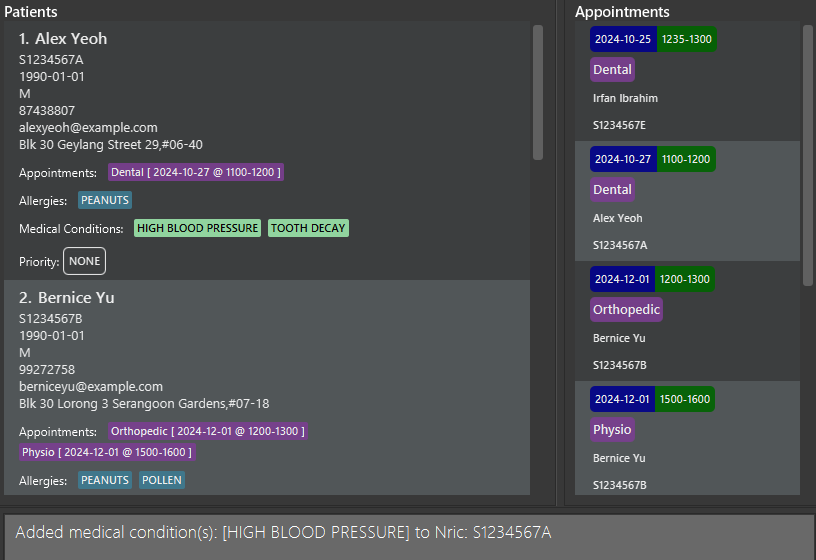
addMedCon i/S1234567A c/High Blood Pressureadds the conditionHigh Blood Pressureto the patient withNRICS1234567A.
Success message, with the “HIGH BLOOD PRESSURE” condition in the details of patient “Alex Yeoh (S1234567A)” in the patient list panel
CONDITIONis case-insensitive.
- e.g.
addMedCon i/S1234567A c/Fluwill add the medical conditionFLUto the patient with the NRICS1234567A.- You can add multiple medical conditions to a patient by using multiple
c/CONDITIONparameters
- e.g.
addMedCon i/S1234567C c/High Blood Pressure c/Osteoporosis
Deleting Medical Conditions : delMedCon
Deletes one or more medical conditions from an existing patient in MediBase3.
Format: delMedCon i/NRIC c/CONDITION...
- Deletes the specified
CONDITIONfrom the patient identified byNRICin MediBase3.- At least one
CONDITIONmust be provided.
- e.g.
delMedCon i/S1234567Ais invalid.- The patient must have the specified condition for it to be removed; otherwise, an error message will display.
- If both unique and non-existent conditions are entered in a single command, an error will be returned, and none of the conditions will be deleted.
- Refer to Parameter Details for constraints on each parameter.
Example:
-
delMedCon i/S1234567A c/High Blood PressuredeletesHigh Blood Pressurefrom the patient withNRICS1234567A.
CONDITIONis case-insensitive.
- e.g.
delMedCon i/S1234567A c/Fluwill delete the medical conditionFLUfrom the patient with the NRICS1234567A.- You can delete multiple medical conditions from a patient by using multiple
c/CONDITIONparameters
- e.g.
delMedCon i/S1234567C c/High Blood Pressure c/Osteoporosis
Managing Allergies
Adding an allergy: addAllergy
Adds one or more allergies to an existing patient in MediBase3.
Format: addAllergy i/NRIC al/ALLERGY…
- Adds the specified
ALLERGYto the patient identified byNRICin MediBase3.- At least one
ALLERGYmust be provided.
- e.g.
addAllergy i/S1234567Ais invalid.- Each allergy can only be added once per patient.
- If both unique and duplicate allergies are entered in a single command, an error will be returned, and none of the allergies will be added.
- Refer to Parameter Details for constraints on each parameter.
Example:
-
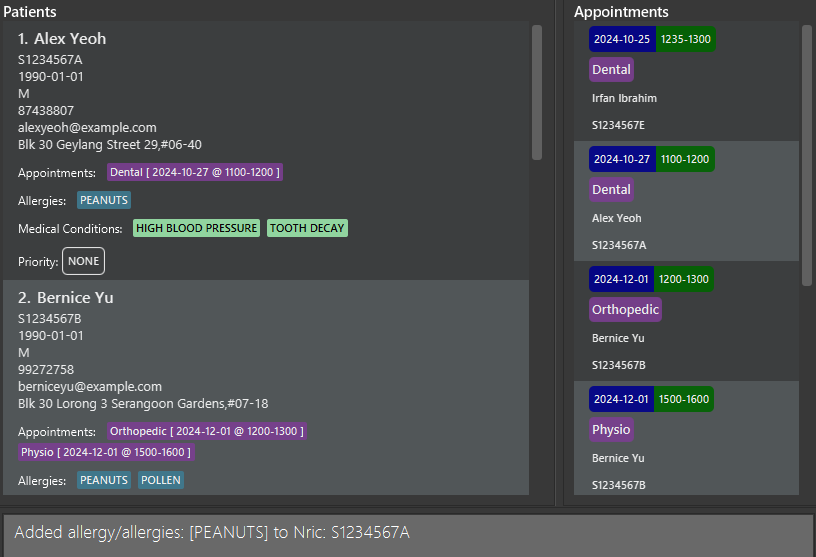
addAllergy i/S1234567A al/Peanutsadds the allergyPeanutsto the patient withNRICS1234567A.
Success message, with the “PEANUTS” in the details of patient “Alex Yeoh (S1234567A)” in the patient list panel
ALLERGYis case-insensitive.
- e.g.
addAllergy i/S1234567A al/Peanutswill add the allergyPEANUTSto the patient with the NRICS1234567A.- You can add multiple allergies to a patient by using multiple
al/ALLERGYparameters.
- e.g.
addAllergy i/S1234567A al/Peanuts al/Dust al/Pollen
Deleting an allergy: delAllergy
Deletes one or more allergies from an existing patient in MediBase3.
Format: delAllergy i/NRIC al/ALLERGY…
- Deletes the specified
ALLERGYfor the patient identified byNRICin MediBase3.- At least one
ALLERGYmust be provided.
- e.g.
delAllergy i/S1234567Ais invalid.- The patient must have the specified
ALLERGYfor it to be removed; otherwise, an error message will be displayed.- If both unique and non-existent allergies are entered in a single command, an error will be returned, and none of the allergies will be deleted.
- Refer to Parameter Details for constraints on each parameter.
Example:
-
delAllergy i/S1234567A al/Peanutsdeletes the allergyPeanutsfrom the patient withNRICS1234567A.
ALLERGYis case-insensitive.
- e.g.
delAllergy i/S1234567A al/Peanutswill delete the allergyPEANUTSfrom the patient with the NRICS1234567A.- You can delete multiple allergies from a patient by using multiple
al/ALLERGYparameters.
- e.g.
delAllergy i/S1234567A al/Peanuts al/Dust al/Pollen
Managing Priority
Setting Priority : setPriority
Sets Priority to an existing patient in MediBase3.
Format: setPriority i/NRIC !/PRIORITY
- Sets Priority to the patient with the specified
NRICin MediBase3.- On default Patient has been set to
NONEPriority level.- Refer to Parameter Details for constraints on each parameter.
Example:
-
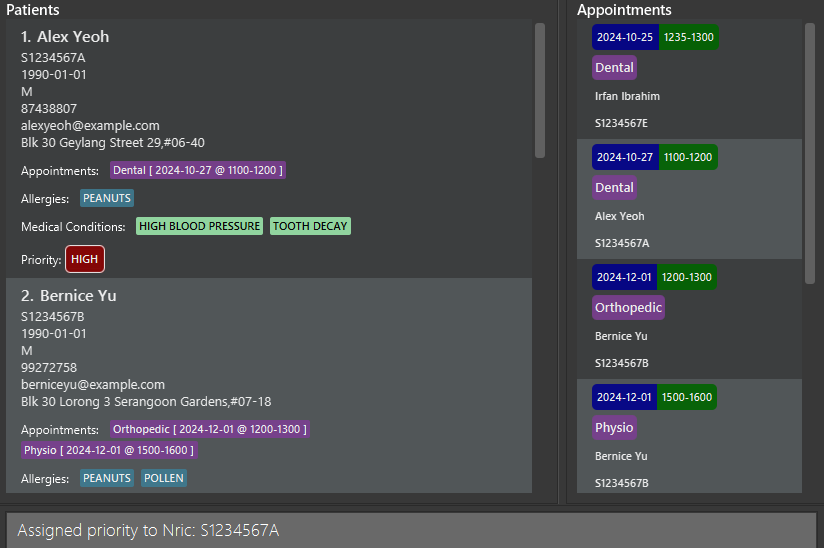
setPriority i/S1234567A !/HIGHwill set the Priority of patient with NRICS1234567AtoHIGH.
Success message, with the priority of the patient “Alex Yeoh (S1234567A)” tagged as “HIGH” in the patient list panel
Finding Patients
- The following commands in this section will alter the view of the Patient List Panel to display only patients that match the given criteria.
- They will not alter the view of the Appointment List Panel.
Listing all patients : list
Shows a list of all patients in MediBase3.
Format: list
If you have used any other commands under the Finding Patients section to alter the view of the Patient List Panel, you can use this command to reset to the default view to view all patients.
Listing all patients by his/her priority: listPrio
Shows a list of all patients with a specific PRIORITY in MediBase3.
Format: listPrio !/PRIORITY
- An empty Patient List Panel will be displayed if no patients with the given
PRIORITYare found.PRIORITYmust adhere to the constraints mentioned in the Parameter Details section.
Example:
-
listPrio !/Highwill display all patients with the priorityHIGH.
Locating patients by name: find
Finds patients whose names contain any of the given keywords.
Format: find KEYWORD [MORE_KEYWORDS]…
- The search is case-insensitive. e.g.
hanswill matchHans- The order of the keywords does not matter. e.g.
Hans Bowill matchBo Hans- Only the name is searched.
- Only full words will be matched e.g.
Hanwill not matchHans- Patients matching at least one keyword will be returned (i.e.
ORsearch).
- e.g.
Hans Bowill returnHans Gruber,Bo Yang- Returns an empty patient list panel if no matching patients with the given keywords are found.
Example:
-
find JohnreturnsjohnandJohn Doe -
find alex davidreturnsAlex Yeoh,David Li
Success message of
find alex davidwith patient names matchingalexordavidshown in the patient list panel
Locating patients by medical condition: findMedCon
Finds patients whose medical condition(s) contain the given keywords.
Format: findMedCon KEYWORD [MORE_KEYWORDS]…
- The search is case-insensitive. e.g
diabeteswill matchDiabetes- The order of the keywords does not matter. e.g.
diabetes arthritiswill matcharthritisanddiabetes- Only the medical condition is searched.
- Only full words will be matched e.g.
diabeteswill not matchdiabete- Patients with medical conditions matching at least one keyword will be returned (i.e.
ORsearch).- Returns an empty Patient List Panel if no matching patients with the given keywords are found.
Example:
-
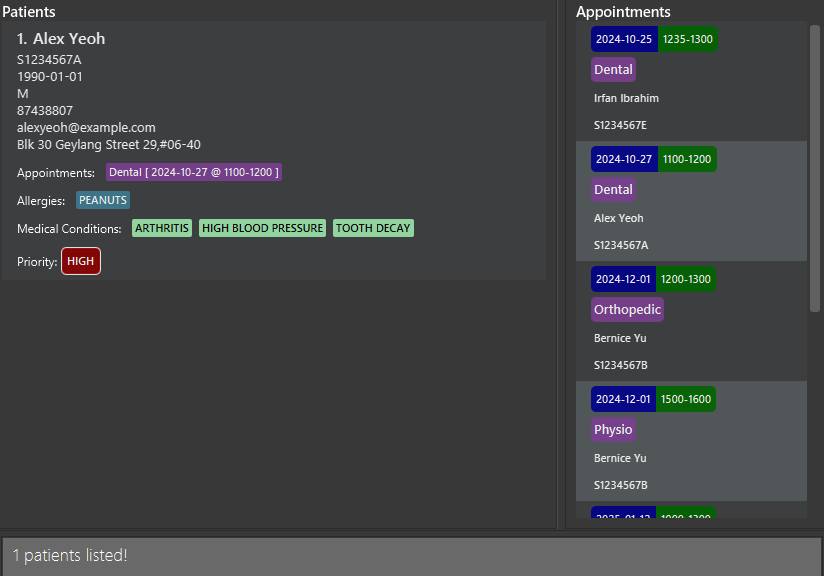
findMedCon diabetes arthritisreturnsAlex YeohandDavid Li
Success message with patient tagged with
diabetesorarthritisshown in the patient list panel
Locating patient by NRIC: findNric
Finds patients based on his/her NRIC.
Format: findNric NRIC
- The search is case-insensitive. e.g
S1234567awill matchS1234567A- Only the
NRICis searched.- The NRIC provided must be the full NRIC of the patient. e.g.
S1234567Aand notS123.- Returns an empty Patient List Panel if no matching patients with the given
NRICare found.NRICmust adhere to the constraints mentioned in the Parameter Details section.
Example:
-
findNric S1234567AreturnsAlex Yeoh
Success message with patient
Alex Yeoh (S1234567A)shown in the patient list panel
General Features
Command History
You can navigate between previous successful commands and your current command by pressing the UP and DOWN arrow keys.
Viewing help : help
Shows a message explaining how to access the help page.
Format: help
Help message popup shown

You can also access this message by clicking on the
Helpbutton or by pressingF1on your keyboard.
Clearing all entries : clear
Clears all entries from the MediBase3 database.
Format: clear
Using the clear command will REMOVE all your patient and appointment data from MediBase3. This action is irreversible.
Exiting the program : exit
Exits the program.
Format: exit
Saving the data
MediBase3 data are saved in the hard disk automatically after any command that changes the data. There is no need to save manually.
Editing the data file
MediBase3 data are saved automatically as a JSON file located at: [JAR file location]/data/MediBase3.json. Advanced users are welcome to update data directly by editing that data file.
When editing the data file, ensure that the application is not running as it might prevent the changes from being reflected correctly.
If your changes to the data file make its format invalid, MediBase3 will discard all data and start with an empty data file on the next run. Hence, it is recommended to take a backup of the file before editing it.
Furthermore, certain edits can cause the MediBase3 to behave in unexpected ways (e.g., if a value entered is outside of the acceptable range). Therefore, edit the data file only if you are confident that you can update it correctly.
Glossary
The table below provides the definitions for the key terms we will be using throughout the guide.
| Term | Definition |
|---|---|
| Alphanumeric | Refers to characters in Standard English, including the 26 letters of the Latin alphabet and the numbers 0-9. |
| Command | An input that is given to the application to perform a specific action. Commands are typically entered via the command box in the application. |
| CLI | Command Line Interface (CLI) is a type of text-based interface that is used to interact with software via commands. |
| GUI | Graphical User Interface (GUI) is a type of interface that allows users to interact with electronic devices through graphical icons and visual indicators. |
| JAR | Java ARchive (JAR) is a package file format typically used to aggregate many Java class files and associated metadata and resources into one file for distribution. |
| JSON | JavaScript Object Notation (JSON) is a lightweight data-interchange format that is easy for humans to read and write and easy for machines to parse and generate. |
| Panel | Region in the GUI that displays a particular item. |
| Parameter | A parameter refers to a field that requires input from the user. For example, in the command delete i/S1234567A, i/S1234567A is a parameter. |
| Prefix | A prefix is a keyword that is used to identify the type of parameter that follows it. For example, in the command delete i/S1234567A, i/ is the prefix for the NRIC parameter. |
| Preamble | A preamble refers to text before the first valid prefix. |
FAQ
Q: How do I transfer my data to another computer?
- A: Install the app in the other computer and overwrite the empty data file it creates with the file that contains the data of your previous MediBase3 home folder.
Q: How do we open the command terminal?
-
A: Windows - Press
Win + R, typecmdand pressEnter. -
A: Mac - Press
Cmd + Space, typeterminaland pressEnter. -
A: Linux - Press
Ctrl + Alt + Tto open the command terminal.
Q: How to install Java 17
- A: Download the Java 17 here. Then follow the installation guide.
For Windows
- Visit the Oracle JDK 17 download page.
- Download the appropriate installer for your system (e.g.,
Windows x64 Installer). - Run the installer and follow the setup instructions.
- Verify the installation by opening Command Prompt and typing:
java -version
You should see something like:
Java vision as seen in Windows Command Prompt / Powershell
This means that your machine is running Java version 17.0.12, which means that Java 17 is installed.
For macOS
- Install Homebrew if you haven’t already. Open Terminal and type:
/bin/bash -c "$(curl -fsSL \ https://raw.githubusercontent.com/Homebrew/install/HEAD/install.sh)" - Install Java 17 by typing:
brew install openjdk@17 - Link the installed JDK:
sudo ln -sfn $(brew --prefix openjdk@17)/libexec/openjdk.jdk \ /Library/Java/JavaVirtualMachines/openjdk-17.jdk - Verify the installation by typing:
java -version
You should see something like this:
Java version as seen in MacOS Terminal
This means that your machine is running Java version 17.0.11, which means that Java 17 is installed.
For Ubuntu/Debian
- Open Terminal.
- Install Java 17 by typing:
sudo apt install openjdk-17-jdk - Verify the installation by typing:
java -version
You should see something like this:
Java version as seen in a Linux shell

This means that your machine is running Java version 17.0.11, which means that Java 17 is installed.
- Java/OpenJDK 17
- JavaFX/OpenJFX 17
Q: Is there a limit to the number of patients/appointments we can add?
- A: As of right now, we do not have a limit to the number of patients/appointments but the limit is dependent on the hardware specification.
Q: Do you support non-English inputs?
- A: We do not support non-English inputs, but we are working on it!
Known issues
-
When using multiple screens, if you move the application to a secondary screen, and later switch to using only the primary screen, the GUI will open off-screen. The remedy is to delete the
preferences.jsonfile created by the application before running the application again. -
If you minimize the Help Window and then run the
helpcommand (or use theHelpmenu, or the keyboard shortcutF1) again, the original Help Window will remain minimized, and no new Help Window will appear. The remedy is to manually restore the minimized Help Window. -
When entering a patient’s date of birth or an appointment date, the application currently accepts the year
0000as a valid year. While it might be valid in some contexts such as the ISO 8601 standard, it is not a valid year in the Gregorian calendar which is the calendar system the typical user might expect.
Command summary
| Action | Format | Examples |
|---|---|---|
| Add | add n/NAME i/NRIC g/GENDER d/DOB p/PHONE e/EMAIL a/ADDRESS |
add n/John Doe i/S1234567A g/M d/2002-12-12 p/98765432 e/johnd@example.com a/Orchard Road, Block 124, #02-01 |
| AddAllergy | addAllergy i/NRIC al/ALLERGY… |
addAllergy i/S1234567A al/Dust al/Pollen |
| AddAppt | addAppt APPOINTMENT_NAME i/NRIC @d/APPOINTMENT_DATE @t/APPOINTMENT_TIME |
addAppt Dental i/S1234567A @d/2024-10-27 @t/1100-1200 |
| AddMedCon | addMedCon i/NRIC c/CONDITION... |
addMedCon i/S1234567A c/High Blood Pressure |
| Clear | clear |
- |
| Delete | delete NRIC |
delete S1234567A |
| DelAllergy | delAllergy i/NRIC al/ALLERGY… |
delAllergy i/S1234567A al/Dust al/Pollen |
| DelAppt | delAppt i/NRIC @d/APPOINTMENT_DATE @t/APPOINTMENT_TIME |
delAppt i/S1234567A @d/2024-10-27 @t/1100-1200 |
| DelMedCon | delMedCon i/NRIC c/CONDITION... |
delMedCon i/S1234567A c/High Blood Pressure |
| Edit | edit NRIC [n/NAME] [i/NRIC] [g/GENDER] [d/DOB] [p/PHONE] [e/EMAIL] [a/ADDRESS] |
edit S1234567A p/91234567 e/johndoe@example.com |
| Exit | exit |
- |
| Find | find KEYWORD [MORE_KEYWORDS] |
find James Jake |
| FindNric | findNric NRIC |
findNric S1234567A |
| FindMedCon | findMedCon KEYWORD [MORE_KEYWORDS] |
findMedCon diabetes arthritis |
| Help | help |
- |
| List | list |
- |
| ListPrio | listPrio !/PRIORITY |
listPrio !/High |
| SetPriority | setPriority i/NRIC !/PRIORITY |
setPriority i/S1234567A !/HIGH |